Pull animation
Posted on Sun 25 May 2014 in fun
In this project (that I did a year and a half ago) I wanted to recreate something I saw somewhere on the Internet. It is one of those things where you have a lot of black lines printed on a piece of transparent film, which you then put on top of another paper and pull from one side to other. I don't know how these are called, but the result you get is pure magic - animation happening right before your eyes!
Check it out
First, look at this amazing horse running:
Here you can see me looking left and right, on and on:
And here's the last thing as a gif animation:
How does it work?
An animation is just a bunch of images (frames) being displayed one by one in a sequence. What we want to do here is to create a single image that will contain all of the frames of our animation, but when we cover it with the transparent film with lines, we only want parts of a single frame to be seen.
Show me an example!
So, let's take this animation for example.
The frames used in this animation were taken by this guy called Eadweard Muybridge somewhere before 1887, which was a long time ago, but the horse still won't stop running! How cool is that?
Exploding the gif
To get all the frames from a .gif file we can use a simple tool called gifsicle. If the gif is called horse.gif, we'd use a command like this:
gifsicle --explode horse.gif
After that, we'll end up with 15 files with filenames like horse.gif.000, horse.gif.001, and so on. Here are the frames:


Change the file names to something better
Let's rename those horse.gif.000, horse.gif.001 to something like frame_0000.gif, frame_0001.gif. There's a script I found on stackoverflow for that:
a=0
for i in *.gif.*; do
  new=$(printf "frame_%04d.gif" ${a}) #04 pad to length of 4
  mv ${i} ${new}
  let a=a+1
done
Convert all .gif files to .jpg
OpenCV doesn't support gif files, so we'll convert them all to jpg. Here's the command to convert all the files in a folder to jpg:
for f in *.gif; do convert "$f" "${f/%gif/jpg}"; done
What now?
It's simple. We just create a new image of the same dimensions as the original gif animation and do the following:
- take the first vertical line from the first frame and copy it to our new image
- take the second vertical line from the second frame and copy it to our new image (right next to the previous line we added)
- take the third vertical line ... wow, it's like there's a pattern in these steps
- ...
- ???
- profit
What when we get beyond the last frame? Start from the first one again, silly!
If we label the i-th vertical line in the j-th frame as j(i), then
we can try visualizing what was written above (for an animation with 4
frames) as:
1(1) 2(2) 3(3) 4(4) 1(5) 2(6) 3(7) 4(8) 1(9) 2(10) 3(11) 4(12) 1(13) 2(14) ...
And then? Get some black lines!
We're almost done now. The only thing we need next is to generate the
black lines which we'll use to cover the image we just generated. As it
was mentioned before, we need to have the lines in such a way that they
cover the parts of the image we don't want to see. And which parts are
that? Well, if we want to show the first frame only, then we need to
cover all the others. It's as simple as that. If we use the
representation from above and mark black lines with an X, we'll get
this:
X X 1(1) X X X 1(5) X X X 1(9) X X X 1(13) X ...
If we move the black lines a bit to the right, we'll get:
X X X 2(2) X X X 2(6) X X X 2(10) X X X 2(14) X X ...
So in the first case we only see the lines from the first frame, and after, when we move the black lines a bit, we'll only see the lines from the second frame. That's it! If we move the black lines a bit more, we'll see the third frame lines and so on.
Give me the code!
The original code I wrote for this was written in c++, but I lost it. I'm sure I have it somewhere, but searching for it would probably take longer then just writing it again, so I wrote it again. This time in python, because yay, python!
Here you go:
import numpy as np
import cv2
import os

#here is where we have the frames stored
frames_directory = 'frames/'

#all files in frames_directory
frames = [os.path.join(frames_directory, frame) for frame in os.listdir(frames_directory)]

#we'll use only jpg files, and let's sort them
frames = sorted([frame for frame in frames if frame.endswith('.jpg')])

#we'll just load the first image and paint over it because why not
animation = cv2.imread(frames[0])

animation_height = animation.shape[0]
animation_width = animation.shape[1]

num_frames = len(frames)

for i in xrange(num_frames):
    current_frame = cv2.imread(frames[i])

    for j in xrange(animation_width / num_frames):
        for k in xrange(animation_height):
            animation[k][j * num_frames + i] = current_frame[k][j * num_frames + i]

#show generated image and save it
cv2.imshow('animation_image', animation)
cv2.imwrite('animation_image.png', animation)

black_lines = np.zeros((animation_height, animation_width), dtype = np.uint8)

for j in xrange(animation_width / num_frames):
    for k in xrange(animation_height):
        black_lines[k][j * num_frames] = 255

#show black lines and save them
cv2.imshow('black_lines', black_lines)
cv2.imwrite('black_lines.png', black_lines)

#show how it looks as a real animation
while (True):
    for f in xrange(num_frames):
        real_animation = np.zeros(animation.shape, dtype = np.uint8)

        for j in xrange(animation_width / num_frames):
            for k in xrange(animation_height):
                real_animation[k][j * num_frames + f] = animation[k][j * num_frames + f]

        cv2.imshow('real_animation', real_animation)
        cv2.waitKey(50)
The code is also available on github.
The code assumes the frames are stored as .jpg images in the folder
frames/. It will generate the animation image, as well as the black
lines image and store them into animation_image.png and
black_lines.png.
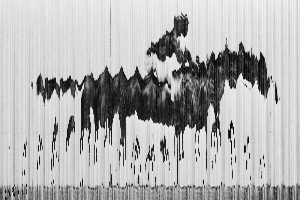
The results
Here's the animation image generated with the horse frames as input:
And here you can see how the animation looks like as a .gif:
But hey! The idea was not to make a .gif but a real life animation! So, go generate your own image, print it out, print out the black lines image on a transparent film and have fun!
Additional comments
You will notice that you won't get nice results if you use animations with too many frames because then you'll need more dark lines to cover the rest of the image. If I remember correctly, animations with five or so frames came out nicely. If your animation has more frames, just try not using some of them.
Also, if you plan to print out these images, you should generate them in a bigger size. Modifying the code to do this shouldn't be too hard! :)